Google+

Tuesday, July 31, 2012

Weekend Recap!

Howdy Dynamos!  Little known fact about the Maraia household, we rock a Sunday/Monday weekend.  Yes, Mr. Dynamite works the Tues-Sat shift at his pays-benefits-and-money job (as opposed to his doesn't-make-a-cent-but-he's-livin-his-dream job).  So, we're back from our fun weekend now, and the Tuesday blues won't set in for at least a half hour, so now is the perfect time to dish about all the fun stuff we saw at the Renegade Craft Fair in LA on Sunday.
  
Okay, so confession time, I am a horrid travel blogger.  I am ridiculously shy, and I am super embarrassed to ask people if I can shoot pictures of their stuff.  I know what I intend to do with the pictures (put it on here so you guys can see the awesome art!) but get crazy nervous that the artist will think that I'm trying to steal their ideas/bootleg their prints or something.  So, I shot a crap-ton of crowd and tent pictures and virtually no awesome-sauce booth stuff...


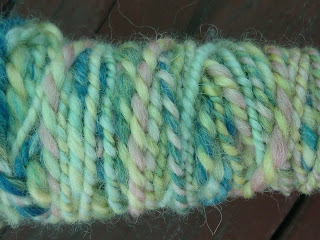
Except my new friend Miryha at Blarney Yarn was so sweet to let me shoot pictures of all her yarn-y goodness!  She hand dyes rovings, and she makes the most beautiful yarns.  Plus, she is just a delight to talk to!  I couldn't leave before I'd bought a new spindle and some of her gorgeous rovings!   So much fun!!!  Actually, Jake asked me what I had bought when we got home, and when I showed him, he asked me why I hadn't bought more of her stuff!  Ahaha!  But lucky for me, Miryha has an Etsy store (it's down right now because of the fair, but it should be back up soon).
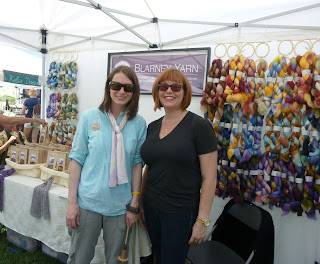
Miryha's the one in blue!
Dear Santa, all I want for Christmas is ALL OF THIS! xo Jaime

The woodworking trailer that SideStreet.org brought was just the coolest thing ever!  Jake and Mims took a one hour (free!) woodworking class.  It was great, and Mims is so proud of the fact that she used a saw and a drill.  (I wish she looked happier in this pic!  Honest, she had the best time at the class.  She wants to do more woodworking projects!)  They made wooden toy cell phones, and Mims has had the best time playing with them.   The class was so good we had to make a donation to the program!  Thanks Blue!

There were a ton of food trucks to choose from!  Indian food, Belgian street food, New Jersey-style hot dogs, fried chicken, blended coffee drinks, even a little ice-cream cart that sold artisan popsicles!  I will say that the curry smell kinda overpowered the other smells, but that was good, since it also overpowered the stench coming from the porta-potty area... :(

 We weren't the only ones at the park!  Do you want to know what the difference between a gopher face and a rat face is when it's looking at you from a hole in the ground right next to your feet?!! The gopher face is bigger!  That's it!  It looked like a giant rat head looking at me.  I am still completely freaked out.  **Fun Fact Tuesday:  Jaime is deathly afraid of rats!  It's irrational and illogical, but I totally totally fear them.  Pass it on!***

While we were in LA anyway, we cruised by a landmark and grabbed some uber-yummy donuts!  It also happens to be about a block away from Jakes 'real' job, so Mims and I got to see where he works.  Industrial and non-descript are the best words that I can use to describe his office...  I think he might use the words "soul crushing," but perhaps I'm wrong... (psst... I'm not wrong...)

When I got home I grabbed my shiny new spindle and wool and got to spinning! The yarn was so soft and spun beautifully.  And the balance on the spindle was a dream!   
 I hadn't spun yarn for almost ten years, so I ended up with 35 yards of rather uneven, but gorgeously colored, yarn.  Seriously, Miryha at Blarney Yarn is a genius!

This is my spindle all full of freshly spun yarn.  The cell phones are the SideStreet.org project that Mims and Jake did.  Cute, huh?!  Mims mocked her dad for having such a boring phone front... Hers is a scribbled pink...

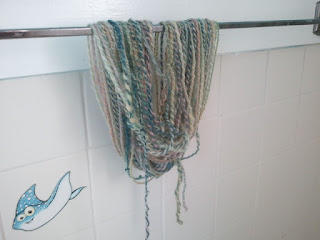
My crazy yarn is now hanging in the bathroom to dry.  I soaked it to set the twist.  It should be ready to use in the morning, or I can twist it up if I don't want to use it right away.  (I'm going to use it right away...)  
Also, I want to give a shout out to some other crafty awesome folk I saw at the fair:
Peanut Butter Dynamite!
Mama Gourds!
Mon Cher Pug!
Emma SanCartier Illustrations!
Gnome Enterprises!
If you get the Tuesday Blues later I would highly recommend checking them out!  I found them to be delightfully inspiring.

Also, today is the last day to enter my giveaway!  So, have you entered yet?  No?!  Go do it now, or no dessert for you tonight.  Seriously.  That's the kind of power I wield.  So click the link already, there's nothin' left to see here...

xoxo

Update 8.1.12:  The giveaway is closed now.  Thanks to all the sweet Dynamos who participated!

Sunday, July 29, 2012

Goin' to the Craft Fair today!

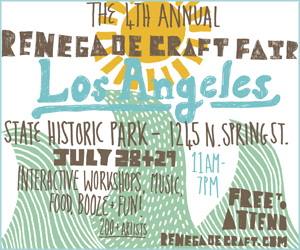
This is where we're going today!  I'm so excited!!!


I needed a new purse.  Not because I don't have three bags that would have been perfectly fine, but I wanted an arty bag that would be fun and show off my crafty-ness... I wanted it to be a cross body bag that would be large enough to hold my stuff, plus whatever goodies I pick up while we're there, but not so big that my shoulder will ache after a day of walking around with it.


It's laminated plastic (Fresh and Easy bags, which I really like because they're made of really thick, strong plastic) and nylon yarn/thread.  I particularly like how the strap turned out.  The flower on the strap is at about corsage level...  And, so you get an idea of the size, it's sitting on one of the chairs that go with Mims's kid-size table...

**I think it's super cheesy to add that the idea for this bag came to me in a dream, even though it totally did.**

I had to make a new wallet too, since my everyday wallet is rather large and quite heavy.  I had picked up this mustache tape last week since I thought it was so funny, and this just seemed like a perfect use for it.


I like it!  It's a little oversized, which should make it easy to find in my bag.  I put a couple of slots in it for my driver's license and atm and medical cards.  Perfect for a day of adventurous wandering.

Okay, we're off for the day!  I will try to do a better job this time of taking pictures of the awesome stuff I see!

xoxo

Friday, July 27, 2012

Purse Frame Project

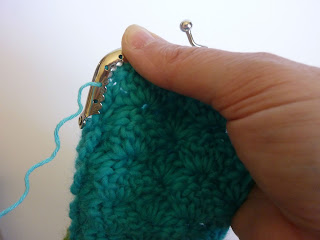
My friend E had a purse frame she wanted to make into the top of a case for her sunglasses.  I'd never worked with a purse frame, but I had seen them in craft stores and I was intrigued.  I had to try working with one myself!  So, inspired by E's project, I've made a sunglasses case.


I think that the ball-topped purse frames are adorably old-fashioned.  I wanted to use a sweet stitch that would add to the nostalgia for this project, so I've used a shell stitch.  (also, I'm on a shell stitch kick...)
This pattern would make a terrible coin purse.  The stitch is too loose and the coins would stretch it out horribly.  If you want to make a purse that would hold your crochet hooks or scissors, you need to line it.  Lining this bag would be super simple, since it's essentially a big rectangle.  I found it unnecessary, since I'm just going to use it for my sunglasses which I wrap with a microfiber cloth anyway.  If you've got sunglasses with small, pokey ear pieces I think I'd go ahead and line it.

I need to get on my soap box for a mome, if you'll bear with me, and snark at the Everything Mary company that sells the purse components at craft stores.  There is so little information on the packaging that I've had to measure the frame myself, all the package says is "silver purse frame." Lame.  Also, the website sucks.  There is a pitifully small amount of information on how to use their products (none in the packaging, btw) so I had to search for information from the crafty-blogger world.  Thank God for crafty bloggers.  Amen.  Okay, back to the post...

Old-Fashioned Spectacle Case (aka: The Purse-Frame Sunglasses Case)
Supplies:
Approx. 55 yards of worsted weight yarn (I used Stitch Nation by Debbie Stoller's Full O' Sheep in Aquamarine and Thyme)
Size G hook
3 1/2" Purse Frame (I used an Everything Mary purse frame I picked up at Joann's)
Embroidery thread to match yarn
Yarn needle, tapestry needle

ch 14
R1: sc in back loop of 2nd ch from hook, sc in the back loop of each ch across (13 st)
R2: ch 1, sc in first st, (skip 2 st, 5 dc in next st, skip 2 st, sc in next st) 2 times (13 st)
R3: ch 3 (counts as first dc), 2 dc in first st, skip 2 st, sc in next st, skip 2 st, 5 dc in next st, skip 2 st, sc in next st, skip 2 st, 3 dc in last st (13 st)
R4-28: repeat rows 2-3, ending on a row 2 row (13 st)
R29: ch 1, sc in each st across (13 st)
Fasten off.  Weave in ends.

** If you would like a color blocked case, do R1-11 in main color, R12-18 in contrast color, and R19-29 in main color.


There is more than one way to sew your case into the frame, but this is the method that I used:
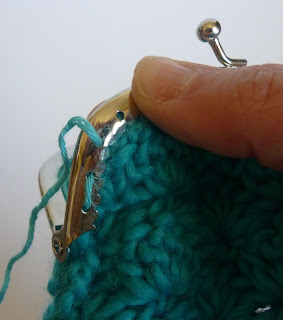
I fit one of the short ends of my finished strip into the purse frame.  I loaded my tapestry needle with embroidery floss and pulled it through the 2nd hole of the frame.

I then sewed in through the first hole, and came back out through the 3rd hole...

Then I sewed in to the 2nd hole, in a backstitch-type sewing pattern.  I followed this pattern all the way to the end of the purse frame.

This is what it looked like when I finished.  I wove the floss ends in, and then stitched in the other side the same way.

After both ends were sewn into the purse frame, I whipstitched the sides of my case together, using yarn and the yarn needle.  I matched the yarn colors when the colors changed on the bag.

I designed this case for my (currently misplaced) smaller sunglasses.  The sunglasses in the picture are a HUGE pair... I'm not so crazy about how they fit in the case...

The purse frame edges poking out like that really, really bothered me.  I wasn't sure if my normal, smaller glasses would cause the same sharp pokey edges, but since it bothered me so much, I thought I would just tack them to the sides of the bag.

I just put a couple of stitches with the yarn through the hinges of the frame and attached them to the bag.  I am much happier with how this looks!

I hope this was helpful!  It was super quick to make, and it was fun to try something new.  Have a Happy Friday Dynamos!

xoxo

update 8.7.12:  Mucho mucho thanks to E for pattern testing and finding 2(!) mistakes on R3.  The pattern is correct now... xo

Thursday, July 26, 2012

Shell Stitch Business Card Holder

Thank you for your patience, Dynamos!  Yesterday's post got too long, so I'm posting the business card patterns today!

I think I'm going to do a formal poll and ask your opinion about this, but do you mind when I post two (or more) patterns in a single post?  Does that make it more fun or more confusing?  I like to group my projects together, which means that sometimes I clump multiple patterns into single posts.  I like it, because it's like an all-brand-new roundup, but I can totally dig that it might make it hard to keep track of where patterns are...

So, now that you're hyper-aware of my multiple pattern posts, here are the patterns for the business card holders that I posted about yesterday!


Shell Stitch Business Card Holder - Fine Weight Yarn Version
Supplies:
Small amount of fine (2) weight yarn (I used Vanna's Glamour by Lion Brand in Platinum)
Size D crochet hook
Yarn needle

ch 26
R1: sc in the back loop of the 2nd ch from hook, sc in the back loop of each ch across (25 st)
R2: ch 1, sc in first st, (skip 2 st, 5 dc in next st, skip 2 st, sc in next st) 5 times (25 st)
R3: ch 3 (counts as first dc) 2 dc in first st, (skip 2 st, 5 dc in next st, skip 2 st, sc in next st) 4 times, 3 dc in last st (25 st)
R4-11: repeat rows 2-3 four more times (25 st)
Fasten off.  Weave in ends.

Fold sides in to the center and whipstitch together to make the back seam.  Make sure the back seam is centered, and whipstitch the bottom closed.  Weave in ends!  Add business cards and enjoy!


Shell Stitch Business Card Holder - Crochet Thread Version
Supplies:
Small amount of size 3 crochet thread (I used Aunt Lydia's Fashion 3 Crochet Cotton in Artist)
Size D crochet hook
Yarn needle

ch 32
R1: sc in the back loop of the 2nd ch from hook, sc in the back loop of each ch across (31 st)
R2: ch 1, sc in first st, (skip 2 st, 5 dc in next st, skip 2 st, sc in next st) 6 times (31 st)
R3: ch 3 (counts as first dc) 2 dc in first st, (skip 2 st, 5 dc in next st, skip 2 st, sc in next st) 5 times, 3 dc in last st (31 st)
R4-13: repeat rows 2-3 five more times (31 st)
Fasten off.  Weave in ends.

Fold sides in to the center and whipstitch together to make the back seam.  Make sure the back seam is centered, and whipstitch the bottom closed.  Weave in ends!  Add business cards and then go show it off to all of your friends!


Stripes and Bars Business Card Holder
Supplies:
Small amount of fine (2) weight yarn (I used Vanna's Glamour by Lion Brand in Platinum)
Size D crochet hook
Yarn needle

ch 26
R1: sc in the back loop of the 2nd ch from hook, sc in the back loop of each ch across (25 st)
R2: ch 1, sc in each st across (25 st)
R3: ch 4 (counts as first dc and ch 1), skip 1 st, dc in next st, (chain 1, skip 1 st, dc in next st,) 11 times (25 st)
R4: ch 1, (sc, sc in ch sp) 12 times, sc in last st (25 st)
R5: ch 1, sc in each st across (25 st)
R6-14: repeat rows 3-5 three more times (25 st) ** there will be 4 dc rows all together**
Fasten off.  Weave in ends.

Fold sides in to the center and whipstitch together to make the back seam.  Make sure the back seam is centered, and whipstitch the bottom closed.  Weave in ends!  Add business cards and then take a picture for the Dynamo Gallery!

Ooh!  That's a good idea for everyone!  If you make a business card holder, email me a picture and I'll add it to the Dynamo Gallery.

One last thing before I go:

This is for those of you who don't think that they have any need for business card holders...
The holder is also the perfect size to use as a Zinger Cozy...
Oh yeah!!  High Fives All Around!!!!


So don't forget to enter my giveaway if you haven't already!!!

xoxo

Wednesday, July 25, 2012

A Giveaway and My New Cards

They're here!  They're here!  They're here!!!!  My new business cards arrived, and I am so excited!

Okay, so you might remember this post where I talked about how unnecessary business cards were for someone like me, and they were, back then.  But times have changed!  Increasingly I am finding opportunities that an actual real business card would be so handy to share my information.  (In particular I am thinking about an especially embarrassing exchange I had with the owner of a shop that I would love to teach classes/workshops for... Oh well.)

I really wanted a card that would stand out, and would have value of some kind. I wanted a card that you wouldn't want to throw away, or stash in the bottom of a desk drawer (to throw out later).  I wanted a card you'd want to USE... Ideally, I wanted to put a pattern on the card.  I played around with that idea for a while, but it wasn't until I had streamlined my mini wishing star pattern that I knew what I was going to do...  So (drum roll, please) here are my cards.


It has the pattern for the Wishing Stars on it and a QR code!  Rad right?!  I am so excited!

I needed a business card holder.  I wanted something pretty.  It had to be crocheted, because it's so important to me to represent my brand in public!  And even if it was simple, I didn't want it to look too simple.  So I made a holder in shell stitch.  I did it in the round, which created some 'how am I going to write this as a pattern' problems.  So I made a second one.  My questions were still not answered.  So I made one flat, which was easy and beautiful and fit just perfectly!  Awesome!  But now I wanted to make another one in case I needed to show how I stitched it together...  So I made another one.


I got inspired and made a different design, thinking that you might like the option of choosing a different look, if the shells weren't your thing.  So I made one with bars...


Then I got it in my head that I wanted to make a shell-stitch business card holder out of size 3 crochet thread, since the weights of the yarns weren't THAT different.  Ahahahaha!!!  Yeah, I had to re-do the case three times, but I'm putting the pattern on too, since crochet thread is cheap and comes in tons of colors.  I mean, why WOULDN'T you want to have one in every color?!


This has left me with a ridiculous quantity of business card holders that all look the same. I will never use them all.  So I'm going to have a giveaway!

I've got 5 business card holders, which each contain a set of 4 of my new fancy-schmancy business cards, available for the giveaway!  But here's the catch, if you win, you have to promise to give 3 of the cards away to crochet-crafty friends to share the love, Dynamo.  Sound like a deal?  Cool!


You have to be a Dynamo (which means you follow me!) to enter.  Leave a comment on this post telling me how you follow: Google Friend Connect or email** and I will enter you to win one of the business card holders!  There will be five (5!) winners!!!  (Everyone is welcome to enter, I'm happy to ship internationally!)

** You may have noticed I've got a new following option now.  I've gotten some sad lamentations from friends that they wished I would offer a follow-by-email option, since they keep missing posts, so I've now included that in my side bar.  So, if you check in regularly, but haven't wanted to use Google Friend Connect, this is your chance to become a full-fledged Dynamo, with all the rights and privileges!**

The giveaway is going to be open until 11:59 pm Tuesday, July 31st.  If you follow by email AND Google Friend Connect, feel free to enter twice, just let me know you're following both ways.  I will pick winners from a random drawing on August 1st!  Good luck!!

(Whew, this post got LONG!!! I'm putting the patterns up tomorrow!)

xoxo

Update 7/31/12:  Comments are closed now.  Thanks for playing!  I will announce winners on Wednesday, August 2nd.

Monday, July 23, 2012

Wedding Wishes

Happy Monday Dynamos!

Remember how I was talking about that book on DIY weddings that I had checked out from the library?  It inspired the wishing stars, which I originally put on this soap dispenser cover.  I was so happy with how it turned out that I've gone ahead and made a whole wedding set.  My Wedding Wish set includes ornament favors, a guest book pen, and comfy wedding flip flops for the reception/honeymoon.

Like I mentioned before, I just adore the idea of making an ornament favor to give to wedding guests.  I love the hand-crafted aspect of the favor, and I love that it's something that guests could treasure for years to come.

Wedding Wishes Star
Supplies:
Small amount of worsted weight yarn (I used Bernat Handicrafter 100% cotton in White)
Size G hook
6mm plastic pearl beads
4mm plastic pearl beads
Size 6/0 glass seed beads
Tulle netting (I used white)
Sewing thread (I used white)
Yarn needle and Sewing needle
5/8" ribbon (I used white organza)
Fiberfill

Make a Wishing Star  using the worsted weight yarn and size G hook.  Before you sew the 2 sides together, decorate the front piece with the tulle and beads.  I began by cutting a small circle of tulle and tacked it to the center of the star piece.  Then I hand sewed an assortment of plastic pearl beads and glass beads to decorate the star on top of the tulle using a sewing needle and thread.  Hide knots on the back of the piece.  Then using yarn and yarn needle, whip stitch the two sides of the star together, leaving the top point of the star unstitched.  Weave in end and fasten off yarn.  Stuff the star with fiberfill.  I used a 3" piece of ribbon for my hanger, but you are welcome to use a longer piece if you would like.  Make a loop with your ribbon and insert the ends in the open top of the star.  Pin in place if desired.  Using a needle and thread, stitch the top point of the star together, being careful to catch the ribbon in your stitches to attach the hanger to the star.   Fasten off the thread with a small knot and hide the ends invisibly.  Snip off any excess thread.

Of course, if I'm completely honest, I really just wanted a wishing star ornament for the medicine cabinet in my bathroom.  I am beyond thrilled.  But I still think it would be neat as a wedding favor, especially with a "A Wish Come True! Jaime and Jake Maraia 10/7/00" type tag.  You can feel free to use your own names and wedding date...

Wedding Wish Guest Book Pen
When I first envisioned my pen covers, I imagined that a covered pen would make a gorgeous guest book pen at weddings.  I also am enamored with the idea that it's a special pen the bride could use afterwards as a special reminder of her special day.


Supplies:
Size 3 crochet thread (I used Aunt Lydia's Fashion 3 Crochet Cotton in White)
Size D hook

6mm plastic pearl beads
4mm plastic pearl beads
Size 6/0 glass seed beads
Sewing thread (I used white)
Yarn needle and Sewing needle

I made a the cover with my Fancy Pen pattern.  I finished the pen completely, weaving in all the ends, before I began sewing the beads on to the top inch and a half of the pen.  I used a doubled piece of thread, since I wanted the beads to be stitched on sturdily.  I randomly attached the beads, using the pearls beads as the focal pieces, and filling in with the small glass beads.  Fasten off the thread with a small knot and hide the ends invisibly.  Snip off any excess thread.


The Wedding Wishes Flip Flops
Okay, this is my favorite project from my wedding set.  There are a ton of tutorials all over the internet on how to cover the straps of your flip flops in single crochet.  I knew that if I wanted to make some flip flop covers, I needed something special.  Something a little more glamorous.  The crochet design is simple, and the same as everyone else out there, but what we're going to do afterwards is what's going to take it from "Uh..." to "Ooooh!!!"  Trust me.

Supplies:

Small amount of worsted weight yarn (I used Bernat Handicrafter 100% cotton in White)
Size G hook
6mm plastic pearl beads
4mm plastic pearl beads
Size 6/0 glass seed beads
Sewing thread (I used white)
Yarn needle and Sewing needle
Pair of flip flops

I used the worsted weight yarn and single crocheted around the strap of the flip flop.  I really smooshed the stitches together to make sure that no part of the strap would show, and to give myself a good base to stitch the beads on to.
 I used the larger pearl beads and sewed them to the top of the strap with a doubled piece of thread so that they were extra sturdy.  I used about two dozen of the large beads.  I alternated which edge I stitched them to, and I sewed them about a 1/2" apart.  I added extras at the toe-strap V, since that part is going to show the most.

Next I sewed the smaller pearl beads to the top of the strap.  I added a small pearl bead between each large pearl bead, and one on each end, which will give it a sort of zig-zag effect.  It took 26 small pearl beads.

Then I went in with the glass beads and just added them wherever there was an empty space.   I really wanted to create the illusion that the top of the flops were jewel encrusted.   I paid special attention to making sure that the single crochet edge of the cover was included in the beading to break the line up and make it more difficult to figure out how the flip flops were made. When you feel like the flops are adequately bejeweled you can fasten off the thread with a small knot and hide the ends invisibly.  Snip off any excess thread. 

 These are my finished flip flops.  You don't have to feel limited to the bead choices that I made.  If your budget allows, I would highly recommend adding Swarovski  crystals to the mix.  It would be super cute to add a blue crystal as a something blue, if you need one.

I think that it would be super sweet to make pairs of reception flip flops for your bridesmaids and The Moms.   Everyone's feet hurt from pinchy shoes by that point of the day.  I made the black pair the same way as I made the white, except I used black yarn to cover the straps.  You could make them to match your wedding colors, and your bridesmaids would be super grateful!

Of course, you don't have to be planning a wedding to make these.  I pretty much live in flip flops, so I'm planning to wear these as just regular footwear.  Cheapy dollar flops aren't really my style, but these are so well disguised I would be comfortable wearing them everywhere.

Okay, Dynamos, I'm off for the day.  But I'll be back on Wednesday, with a giveaway!!!  So come back to get in on the fun!

xoxo


Saturday, July 21, 2012

Super Powers

My daughter, Mims, is a fancy little girl.  She's a girly-girl that is obsessed with frilly dresses and will do any chore, no matter how horrible, if I will let her wear lip gloss.  She one time cried in Target when I tried to buy her a Batman shirt, because it wasn't pretty enough.

She is also a crazy daredevil, who will launch herself off the 2nd story of her playhouse to tackle her dad (it's a game they play, he's prepared, she's not being reckless).  Her love of the Adventure Time cartoons has lead to her love of the Adventure Time comic books, and her relentless hounding of us to help her learn to read them (my mom's a reading specialist, we are helping her).  She particularly loves Marceline, the vampire queen, and will (for no reason at all) do a hissing impression of her.  She once performed an entire self-composed rock opera about a Skeleton Queen who got one more chance to live in our world. It sounded a little like Tao Cruz's Dynamite song...

Mims loves jewelry.  And barrettes. She wore 8 barrettes in her hair yesterday, because they were glittery and shined like jewels.  She alternates between wanting to cut her hair so that she and I can be matching, and  wanting to grow her hair out to be as long as Rapunzel's in Tangled.  I'm pretty sure she would try to swing from a tree by her hair (like in the movie) if she could grow it that long...

My girl is so into my crocheting.  She would like to learn, but she's just too little to get both of her hands to do what they need to do to crochet.  So, instead, she sits on my lap and watches me.  She constantly asks if the piece I'm working on is for her.  She declares that everything I make is "So cute, Mama!"


For my sweet little girl, I made a Star Ring.  I crocheted a Wishing Star out of size 10 crochet thread and used a size 8 steel hook.  The ring band was made by chaining 20 stitiches, joining the ends of the chain with a slip stitch, and then making a second row of single crochet in the back of the chain loops.  Easy peasy!  I just stitched the ring band on to the back of the star to make the cute ring.


But wait! This is no ordinary ring!  This is a ring with super powers!  Just like my Mims, it looks sweet and girly on the outside, but inside it's filled with magic!!!


Did I say magic?!  I meant a magnet!  I slipped one of those super tiny neo magnets inside the star before I sewed it up.  Mims has these toys that are activated by magnets, so I thought it would be funny if she could use her 'super powers' to activate them as well!


The magnets came in a four-pack, so I made some stars for our fridge.


I think if I ordered really good magnets on Amazon it probably wouldn't take two of them to hold up Mims's picture.  That's what I get for buying the cheapies at Walmart.
(Do you adore my skull magnet?  I was in a painting phase a couple of years ago and made all sorts of weird stuff.  I'm a little sad that the resin is beginning to yellow...)


Okay, so this is my fave!  I made a magnetic star bracelet for myself.  Not because of any magical healing properties, or anything like that, but because sometimes it's helpful to have a magnet nearby.


I used Super Lon nylon thread to make a cobra stitch macrame bracelet.  Then I just sewed my star together around the bracelet.  So simple, but I've used it every day!  I think it would also look super cute sewn on to a Sprite bangle!  Hmm, sounds like a great gift for all my crafty friends before they start their holiday sewing...

xoxo

Related Posts Plugin for WordPress, Blogger...