I spent a year and a half going to cooking school to become a pastry chef. I adored every minute of it. I can talk gluten windows, and hydroscopic properties of sweeteners, and mallard browning effect for HOURS. Literally. I love, love, love that it takes science and art and math to create deliciousness.
My best friend at cooking school, Amy, gave me the raddest (yes, that's a word I actually use) potholders for Christmas one year. She had found a company that made these huge potholders that were amazing. I wore those things OUT!!! Because, although it's a rite of passage to get burned so badly it scars, it's not fun to actually do it. Amy and I were lucky, we never made it into the "stitched my finger back on" crew (shout out to Christian!!).
So, when I say I make the best brownies in the world, you have to know that it's no joke. They are the best brownies in the world. You also have to know that I am desperate to share my recipes with the world, but I had to figure out a way to combine my passion for cooking with my passion for crochet. Otherwise, I should have named this, Jaime Bakes (and crafts a little).
But, no, dear Dynamos, a day without crochet is like a day without sunshine! I couldn't betray my blog with a post that had nothing to do with crochet. So, I set out to make my own version of those awesome huge potholders. That way, I would
have to bake my brownies to show off how well they worked! Win, win!!
Here is where I ran into a bit of a problem, though. See, Jake has homemade potholder rules. To be fair, they have come from actual experiences that have led to him getting burned/maimed/dropping hot pans of food on the floor. Homemade potholders don't bother me, but Jake doesn't have what he lovingly refers to as "my asbestos fingers." I had to make sure that any potholders I made would pass the Jake test...
Jake's Homemade Potholder Rules:
1. No holes. No spaces that a finger can poke through, get caught, and then get burned.
2. Use appropriate fire resistant materials. Nothing that could melt as he's pulling a pan out of the oven.
3. It must use as many layers as needed to keep the heat away from his hand. Two pieces of quilting fabric, with a thin layer of batting between them, has fooled him often enough that he now makes me use potholders on their inaugural run.
4. It must be large enough to actually fit his hand. This one is a little ridiculous to me, since he's got the hands of a giant (he's 6'5"), but I go with it.
I was pretty sure that I could create a potholder that would meet Jake's specifications, yet satisfy my own design requirements. Oversized, cotton, heavy duty, cooking-school-worthy! This one will keep you out of the "burn scar club," but I will give you points towards your Crochet Cooking Badge!!
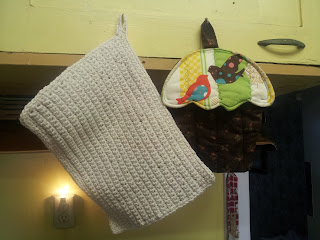
The Cooking School Potholder
Supplies:
1 skein Lion Brand Cotton (or other 100% cotton worsted weight yarn)
Size G crochet hook
Yarn Needle
100% cotton batting - 9"x11"
Potholder Sides:
(make 2)
ch 41
R1: sc in 2nd ch from hook, sc in each ch space across, ch 1, turn (40 st)
R2-31: sc in each st across, ch 1, turn (40 st)
R32: sc in each st across (40 st)
Fasten off. Weave in ends. Or don't weave in ends and just crochet over them in the final step.
Potholder Tab:
(just make 1)
ch 10
R1: sc in 2nd ch from hook, sc in each ch space across
Fasten off. Don't bother weaving in ends. Lazy crochet at its finest!
Match potholder sides so that the stitches line up with each other. Attach yarn into one of the corners that will make it so you can crochet along one of the long sides first. 40 sc along the first side, add 2 more sc into the corner (3 all together), 30 sc evenly spaced along the short side, slip the tab piece into corner and sl st it into place (tucking in any loose ends as you go), 38 sc along the other long side (matching stitches together), now pause:
Slide the piece of cotton quilter's batting inside the potholder. Cut it down if it's too big or it doesn't fit right. Flatten it out and make sure that it's not lumpy.
Now: put 2 more sc in the corner, 30 sc across bottom of potholder to close it, 2 sc in the final/beginning corner. Fasten off. Weave in ends. Hang your potholder up to admire it! Doesn't it look good?! Heck yeah it does! You should pre-heat the oven to 325 degrees to test that baby out! Seriously, pre-heat the oven. My world famous brownie recipe is coming...
The World's Best Brownies
(disclaimer: These are the world's best brownies. You will want to eat the whole pan. Have a plan in place for what you're going to tell your family when that happens. Good lies include: Dropped the pan on the floor, gave them to the homeless, although perhaps the it's-none-of-your-business-where-the-brownies-are approach is better. Keep it simple.)
(Also, using box mixes is not a cooking school technique. It's a super busy mom technique. I apologize to any cooking purists who are disappointed in this recipe, and I will refer them to the Cooks Illustrated website to find a homemade brownie recipe more to their sensibilities. The rest of us will be enjoying our brownies in peace now.)
Get a box of Ghiradelli's Chocolate Supreme brownie mix (you'll know it's the right one because it's got the packet of chocolate syrup inside)
Now, look at the back of the box. Where it says 1/4 c Water, actually get out 1/4 c Whole Milk. Where it says 1/3 c Oil, actually get out 1/3 c Melted Butter. Okay, get out a stick of butter, cut it to the 1/3 c measurement, unwrap it and put it into a microwave safe bowl. Then melt it in the microwave. It's okay. We'll wait... In fact, get out a bowl and a whisk and an egg while you're waiting around. Look in the cupboard for the vanilla you use for your Christmas cookies. Get that out too.
Now that you've got all your stuff ready (nice mise en place, btw!), crack the egg into your mixing bowl. Whisk it around until it's nice and scrambled. Add the milk and whisk it in too. Add about 1 Tbsp Vanilla to the egg/milk mixture. While you're at it, whisk the contents of that chocolate sauce packet into your mixture as well. It will NOT be chocolate milk smooth. That's okay.
Now add about 1/4 of the dry brownie mix to the wet mixture. Whisk it a little. This is mostly to keep your hot melted butter from scrambling the egg when you add it next. Go ahead, add the melted butter now. Whisk it around. Now add the rest of the dry brownie mix. Do Not Whisk It! Grab a fork and slowly mix it into the wet ingredients. Don't stir it any more than you absolutely have to. There may still be some dry lumps when you are done. That's good. It means you did it right. Now set your bowl aside for a moment.
Line a baking pan (I use a 9x9) with parchment paper. Use plenty of it so that it comes up over the sides, so you don't have to scrub dry, crusty brownie off your pan later. Pour your brownie mix into the pan and smooth it out with a spatula. Pop it into the oven and set your timer.
A note about brownie baking times:
My dear sister-in-law is an excellent brownie baker. She uses a formula that has worked for her for years, which is, prepare the brownies the way they say on the box, but under-cook them by about 5 minutes. This creates moist, fudgy brownies that are very delicious. But we're not going for merely very delicious brownies here! We're going for WORLD WIDE FAME!!!!! Yes, I yelled it, and it echoed dramatically. So here's the deal, with the extra substitutions that we've made to modify our brownie mix, you can't under-cook them and have them turn out like brownies. I've tried. They turn out like hot, fudgy goo. Delicious, but goo. They will set up in the fridge, but they will taste more like fudge than like a brownie. So, bake the brownie the full time recommended on the back of the box for your pan size. I bake mine for 40 minutes.
When they come out of the oven you need to let them sit and rest for at least 15 minutes. This will let them cool a little and allow the structure of the brownie to set up. Trust me, it's worth the wait. Then you can slice them up and serve them! Your mouth can send me a thank you note after it's done chewing... LOL!!!!
xoxo


.jpg)


