Google+

Monday, April 30, 2012

I'm an Auntie!!!

My nephew was born yesterday.  I am now a very proud Auntie Jaime!  I had forgotten how tiny new babies are.  Mims is in the 95th percentile for height, I'm used to 44" tall five-year-olds.  I also got a chance to swaddle him, which was a bummer because it's been 5 years, and I'm so rusty that he was able to pop the blanket apart in ten seconds...
His initials are DC, and his daddy (and uncle!) are huge comic book fans, so of course I had to make him a DC logo hat.  I know, it's an old version of the logo, but it's iconic, and the new logo doesn't evoke the same nostalgia.  Also, I wasn't sure I could actually crochet the new logo... lol!

You might notice that I crocheted a baby head to model the hat.  If it helps, I felt like a nut when I did it, but I expect that my nephew is going to inspire a lot of creations, and I needed an 'at home' model. Mims tossed it around for a while like a ball, but quickly lost interest in it, so I think I'm actually going to be able to use it for it's intended purpose...

Anyway, I just wanted to brag that I have a new baby to love!  Congratulations to S and B, and welcome to our family DC!!!
xoxo

Saturday, April 28, 2012

The Rainbow Cash Keeper

I wanted a rainbow wallet.  Don't ask me why.  I have a gorgeous wallet.  I don't need another wallet.  But I wanted one.  A rainbow wallet, with fluffy clouds.

My balls of brightly colored cotton were calling, so I grabbed a dollar bill so that I made my wallet the right size and began crocheting away.  I studied wallet design, making sure that my wallet would close properly and stay closed, although I wasn't opposed to a button closure if it needed one. I stayed up waaay too late to finish the cloudy part...

Yeah, did you know that credit cards are not "half a dollar" sized?  I had to learn that one the hard way.  My wallet wasn't good for anything other than holding cash, which, for anyone that knows me, is not something I carry often. Fail! But on the bright side, it will be super cute for Mims to play pretend with.  Mom FTW!!!

So now, dear Crochet Dynamos, I am at a bit of a loss.  Do I forge ahead with a 2nd, larger, more appropriately sized wallet, or do I move on to something that an adult would carry?  It is a conundrum for sure... How delightful that that's my biggest worry today... ;D
xoxo

Friday, April 27, 2012

Business Cards

My mom and I were talking about business cards the other day.  I spend my days taking care of my 2 girls, my 5 year-old Mims, and my 91 year-old Mema, and my mom is a teacher, so we do not have any call in our normal lives to need business cards. Yet, every once in a while, it would be really helpful to have a way to give someone my contact information without having to fish through my purse for an old receipt.  But that's not really a good enough reason to order 500 business cards, even if (as my awesomely supportive mom suggested) it would be fun to make a cool case for them.

I have seen, in a very expensive (for my budget) catalog, some personalized 'business cards' that were actually 3x5 cards.  Now, this company was offering them with embossed printing on high end cardstock in 3 different designs, which would be perfect for a business professional to show how successful and important they are. I am a stay-at-home-health-care-worker, I am all over the DIY version of this!

Supplies for Personalized Business 3x5 Cards:
A $0.49 package of blank 3x5 cards
15 minutes to figure out Word (there's a 3x5 template, btw)
2 minutes to print a fat stack of them out! Done!

The advantage to this, besides being cheaper than dirt, is that I have a ton of room to add a note, or to jot down a commission estimate, or add some other detail that might not be appropriate for every situation. Plus, I printed some on plain index cards, and a few on the back of lined index cards, giving me more options for my business contact needs...

So now that I had my new fancy-shmancy business cards, I had to make a cool case for them.  I wanted something that would hold them together, but would also give me a surface to write on, in case I was out in the world and needed to write on the fly.  I had an index card holder made of an icky rubber plastic when I was in college that I based this design on, but I made mine out of cotton and it feels divine.  Plus, it holds, like, 30 cards.  I am set for the next 10 years!!!
When I showed it to Jake, he immediately declared that I needed to make one for him. He outlines his novels on index cards and has to tote them around on his travels, in case he gets an opportunity to work, so they are constantly getting mixed up and abused.  He has requested a less colorful version.  I think that he will get what I make for him and be grateful. Ahahahaha!!!
xoxo

Update 2/07/13: Want to make your own holder?  Check out the pattern for my Index Card Holder HERE!!!

Wednesday, April 25, 2012

The Fancy Pen and a Pencil Grip

I like fancy pens.  I like pens that don't look like you bought them 10 for $2 at Target.  Don't get me wrong, I like buying pens for 10 for $2, I just don't like them to look like that's what I did.  Fancy pens don't get accidentally stolen when you lend them out.  They might get purposefully stolen, but it's never an accident, and it's not very often.

I have made a lot of fancy pens in my day.  I have made dozens of polymer clay covered pens for myself and my family.  I have made my fair share of floral-tape-covered-flower-topped pens for shower gifts. I was passing a Dollar Tree the other day and the big bunches of fake flowers made me think about fancy pens, and then my brain got going on the idea of a fancy crochet pen...

I grabbed my hook and started experimenting.  What I discovered is that making pen covers is really, really fun!

They are a little bit tricky, and I found that I had to count the stitches in each row to keep them from narrowing on me.  There's not much leeway with the diameter of the small hollow tube, too big and it slides off, too small and you can't wedge the pen inside. There's also a lot of flexibility in the pattern, since there isn't a set number of rows to cover a pen. Some colors look good stretched along the length of the pen, some you have to smoosh the rows together to keep the pen barrel from showing and so they require more rows to get to the end.  I found that I needed 35-40 rows to cover each pen.
I also discovered that the same hollow tube pattern worked as an awesome pencil grip, if you stopped after 10 rows.  Mims has been having trouble gripping her pencils properly, and I'm hoping that putting a fancy new grip, in her favorite color, will inspire her to want to hold her pencil in a way that the school system will find appropriate.

If you want to start crocheting your own Fancy Pens, I would highly recommend leaving a long tail when you make your magic loop to start, and a long tail when you fasten off at the end.  I ended up using the long strands to help snug the case around the pen at the  tip, and to finish stitching the top together, and then tighten it into place at the top.  It was really helpful to have long pieces of yarn to work with, since it's such a small area to try to connect a new piece of yarn.

The Fancy Pen
I used size 3 super-fine crochet cotton and a size D hook and covered a Bic Stic pen. I also used a sharp tapestry needle with a large eye to weave the ends in, and a large eyed yarn needle for weaving ribbons.

R1: 7 sc in a magic loop, sl st to first st to join round. Do not pull loop closed. (7 st)
R2: ch 1, sc in each st, sl st to first st to join round. (7 st)
R3- 40+ : Repeat row 2 as necessary to cover pen (between 35 and 40 rows, check by sliding work onto pen occasionally as you work) (7 st)
Final Row: Put pen inside cover before your start the last row.  (Sc 2 st tog) 3 times, finish off.  That seventh stitch is tiny and there's no need to connect it to the last row.  Leave a long tail and stitch across the last row together, covering the top end of the pen.

The Fancy Pencil Grip
Make it just the same as the Fancy Pen, but finish at Row 10, without using the final row.  Finish off and weave in ends.  Your hollow tube is now perfect for making boring pencils fancy and keeping your fingers from cramping.

If a plain cover isn't fancy enough for you, you could add stripes.  I started my stripes at the 27th row, but you could make stunning pens if you started your stripes from the beginning.  I think that candy cane stripes would be fun, and black and white stripes are classic.  I used Mim's favorite colors on the red and turquoise striped pen, and I made the Captain America Pen for Jake.  I can imagine doing the stripes in school colors, or for your favorite sports teams.  I'm planning to make some Angels and Lakers pens for Christmas gifts...

 These last pens are Extra Fancy.  The off-white pen I wanted to weave a ribbon into. At Row 30, I chained 2 and did a row of dc, followed by 5 more regular rows.  Once the pen was covered and the ends were woven in, I used a large eyed yarn needle and wove my grosgrain ribbon through the dc row.  I used ribbon that I had, but I think it would look amazing with a white organza ribbon, which would make a big, fluffy bow.  I can imagine that it would be perfect for a wedding guest book pen, or if you used your wedding colors, it would make a great bridesmaid gift, or a special pen for the bride...
The crochet flower is just tied on to the green pen, but I think it's so fun and girly and just cute, cute, cute.  I have a cousin who is in 6th grade, and I think it would be right up her alley.  I also think it would make a cute May Day gift.  In fact, I think all of them would make cool Mother's Day gifts.  I know I would be thrilled to get one, but then again, I really love Fancy Pens...
xoxo

A Return to My Favorites

So, it's been nearly two weeks, and my Minor Awards Ceremony headband is still my favorite accessory, probably since it doesn't slip off, and it does a great job keeping my awkward length hair out of my eyes.  I have also trimmed two inches off the bottom of my hair (I don't know how else to word that, but I do realize that it would be ridiculous to trim anything but the bottom of your hair.  I guess I should change it to "I cut my hair") so now all of it is a similar length.  It still pulls back into a ponytail, but it's about as long as Julia Louis-Dryfuss's hair in Veep... Yeah, I'm going to need more headbands.
Both of these are made out of fine weight crochet cotton, the size 3 Aunt Lydia's kind, but the black one I used with a size D hook, and the ivory one was made with a size G hook for a lacy look.  They're both just as amazing as the bronze one I fell in love with, but neither are as stretchy, since cotton isn't a stretchy yarn in the first place, so I would highly recommend you chain a little loosely, and then work that first row in the back loop of the chain, since you don't want to end up with one edge of your headband that's super tight (not that I know that from personal experience with the black one, ahem).  The blue flowers I just tied into the black band, since I wasn't sure I was going to like them (they're not centered, they sit jauntily off to the side), but I may go back and stitch them on more permanently, now that I know that I'm comfortable rocking the look.

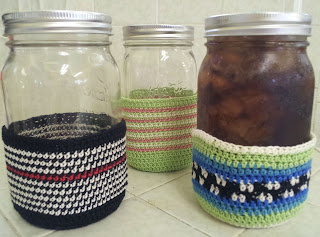
I've also been keeping busy with my jar cover coaster thingies.  I want to call them Jar Socks.  Is that too lame?  My sister requested one for her birthday, so I've made her a The Night Circus themed one. I'm planning to get her a copy of the book to go with it.  I might also crochet a rose for the top?  Have you read the book? What do you think?
Okay, you caught me, I haven't woven the ends in on this one yet, but  I didn't realize it would show through the jar so obviously.  I may redo this picture.  Well, you get the point.  Black and white, with a touch of red, I think she's going to love it once she's read the book.  And if you haven't read the book either, I highly recommend it.  I hope you will fall in love with it the way I did.
This is the collection of Jar Socks (hmm, not sure I'm crazy about that afterall) that I've done in the last couple of days.  My sister's Night Circus jar, a green and pink one for my mom for Mother's Day, and then the crazy checkered one is mine (protecting my Pepsi Max) which matches the top that I made for my previous post about the jars.  I like the way the finer gauge crochet cotton looks, and it seems to be as absorbent as the worsted weight cotton, but it doesn't get saggy and heavy like my previous one did.  I'm still working out a lid system, but overall, I feel like this is becoming something I'm pleased with.  I think I like the look of the single crocheted ones better than my cover which I used half double crochet stitches on.

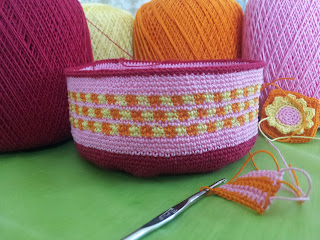
My vase.  I love the idea of my vase so much, but lordy, I am having a challenge figuring out what to do with the idea now that I know it works.  I'd like to create vases that would be art pieces, or would be appropriate for selling in high-end boutiques, and worsted weight yarn was just not doing it for me.  They looked thick and clumsy and, worst of all, serviceable. Not the Gift-For-Someone-Who-Has-Everything I wanted.  So, I tried size 10 crochet cotton with a size 6 steel hook.  This bowl represents two days of my life: 
That's not even the worst part. This is the worst part:

I look at all those threads to be woven in, and I see another two days of my life.  I don't think this one is going to make it to full vase shape. Maybe I will seal it up and use it to hold M&Ms, or keys, or something precious and amazing, because I just can't bear to finish it or to throw it away...  Do you know what I should do with it, my Crochet Dynamos?
xoxo

Tuesday, April 24, 2012

The Crochet Button

I have been crafty for a long time.  For a brief stint I had the opportunity to work as a professional knitter (which was awesome, btw), and I have been sewing like crazy since I was about 10 and my mom taught me to use her machine.  I've sewn dresses and quilts, but my favorite thing to sew is bags.  Big bags, small bags, purses, reusable shopping bags made of laminated grocery bags, you name the bag, I've probably made one.

But this is not the Jaime Sews blog, this is Crochet Dynamite!  And I needed to represent!  So I made The London Crochet Bag to carry around my current crochet project and my tool bag.  I based it loosely on a bag that my SIL picked up the last time we were in London, which was a slouchy hobo-type bag with a ton of room and a nice big opening, but I didn't want to add a zipper (which was how that bag, and the two dozen bags that I've sewn based on that bag, closed.  It's a pretty awesome bag.).  So I left it open.

Flash forward a couple of days and my frustration level was through the roof.  I've been using super fine crochet cotton for pretty much everything right now because I'm in love with bright colors for spring, and the balls kept rolling out of my bag if I wasn't careful how I set it down.  Annoying!  So I needed a way to close the bag, but I still thought a zipper would stretch my handcrafted cloth weirdly, and would be a pain to install. But a button would be perfect, assuming that I could find a button that would look good with my bag, and would be fairly cheap, since this bag was made using up leftover green yarn from the sushi coasters and black Ducky Momo eye yarn.

I didn't have time to head over to the craft store that day, so I began playing with the idea of doing a bubble-type button, stuffed with fiberfill so it would hold its shape.  The sphere itself was easy to make, but when I got to the last row, it started to collapse onto itself, which then I smooshed further, and was delighted with the awesome large button shape that it made.  The worsted weight yarn made the button dense, and with a few stitches to hold the two sides in place, I was over the moon!  It was a button.  I wove in the ends and then attached a new tail of yarn to sew it to the bag.  It worked like a charm.  I made a loop for the other side of the bag to fit my oversized crochet button and none of my yarn has rolled out since.

I do not believe that I originated this idea, even though I've never seen it before.  It seemed super intuitive and so I am sure that someone made a name for themselves in the '70s by teaching the crochet button technique and that they are super famous for it.  So, even though I feel like a crochet genius, I am pretty sure that I have just re-invented a wheel.

But, if you've never heard of this, then I am taking full credit, because I can see so many practical applications for handcrafted buttons.  And they are fast and cheap, but they look like they would be pricey.  Shoot, they would be pricey, if you bought them on etsy.  I should look at etsy, I'm sure someone already is selling them...
Back to what I was saying... If you'd like to make your own, here's the super secret pattern:

The Crochet Button
I used worsted weight yarn with a size G hook.  I also tried it with size 3 super fine crochet cotton and a size D hook.  Both worked well, but obviously the larger yarn and hook made a larger button.

R1: 6 sc in a magic loop, sl st to first sc to join round. (6 st)
R2: ch 1, 2 sc in each st around, sl st to first sc to join round. (12 st)
R3: ch 1, (2 sc in next st, sc) 6 times, sl st to first sc to join round. (18 st)
R4-5: ch 1, sc in each st, sl st to first sc to join round. (18 st)
R6: ch 1, (sc 2 st tog, sc) 6 times, sl st to first sc to join round. (12 st)
R7: ch 1, (sc 2 st tog) 6 times, sl st to first sc to join round. (6 st)
Collapse sphere on itself.  Weave in end from magic loop, making sure to tighten it and secure it.
Using the tail from R7, tack the flattened disc together in a few places, trying to keep your stitches invisible on the front (good side) of the button.  Weave in end.

 Use an additional piece of yarn (or matching thread) to sew onto your project.  Or, attach to a index card and sell on etsy.  I am sure you could make a fortune! lol!

Really, it's a simple formula that you could adjust the numbers for to make different sized buttons, if you needed something smaller for your project.  R1: 5 st, R2: 10 st, R3: 15 st, R4-5 15 st, R6: 10 st, R7: 5 st.  If you wanted to make a button smaller then that, I would sc into a chain space, since the magic loop might make it difficult to close a ring smaller than 5 stitches... But, give it a try, you'll know within a minute if it will work for you or not...

I have been busting projects out here, and assuming that my patterns are readable, since I think I am using standard crochet abbreviations.  Would a key be helpful?  I could make one for the terms that I use, and I could also explain the magic loop and how I change colors if anyone would be interested.  Leave me a comment if you'd like me to do a future post about that.  Otherwise, I'm just going to go along merrily on my way, confident that we all understand what we're doing.  Love to you all, my Crochet Dynamos!
xoxo

Sunday, April 22, 2012

Craft Fail, and I need a metal punch...

I have been in Create! Create! Create! mode lately, which has lead to the inevitable glory that is the craft fail. Why am I sharing this? Because I want to remember my progress, good and bad, and I love it when people that I follow and respect show that they're human.  Plus, I believe my ideas were good, it's the execution that needs fine tuning.

It all started with my love of the awesomeness that is the large fast food cup.  Not styrofoam or paper, since those tend to break quickly (and drench me in the process), but the big plastic cups that can be washed and reused over and over.  I love them.  Really.  But the lids break and after a few days the small cracks become big cracks, and they no longer fit tightly on the cup.  And a tight fitting lid is why I like the cups so much.  I have a five-year-old and a big dog.  My cup gets knocked over daily, and having a barrier that keeps the tidal wave of iced tea from pouring out onto the carpet is essential.  Also, I prefer my tea with no dog hair or Playdoh in it.

The big problem with fast food cups, besides the lid cracking I've already addressed, is that I feel really guilty about using them, since they're not eco-friendly.  I would feel a lot better about using something that I didn't feel was destroying the environment.  Happy Earth Day, by the way...  I know that they sell plastic to-go type cups, and I have bought several of them for $15 each, but the "reusable straw" always gets gross after a couple of days, and they're just too small since I love ice.  I really love ice.  Obsessed might be the appropriate word to describe my relationship with ice, and ultimately, those 16 oz cups don't hold more than three or four sips of iced tea when you pack them full of ice first.

Two of Jake's favorite restaurants use quart sized mason jars for cups, which made me think that might be an excellent choice for our home drinking needs. A quart is pretty big, which would allow me to have all the ice I want in my tea, and not have to refill it twenty times a day. Plus, glass is eco-friendly.  It doesn't break down, but it can be recycled, and no matter how gross it gets I can run it through a dishwasher and it will be good as new.  I still needed to solve the lid issue, since, seriously, I need a lid.  I also wanted the portability that a fast food cup gives, and a slippery glass jar might not.  So this is what I came up with:
A grippy coaster bottom that was absorbent, would protect my hand from icy beverages, and would make my cup easily identifiable in a crowd?  Win, win, win! I was elated!  

 Here is my craft fail though.  The crocheted piece was just too thick to sit properly on the top of the jar, and the metal ring wouldn't hold it in place.  I tried again with a fine weight cotton thread instead and it bowed and fell into the jar as well.
So, I ended up cutting a circle out of a cereal box, putting my crocheted lid into the ring, and then putting the cardboard circle on top of it to back it and keep it sturdy and flat.  The ring screwed on perfectly and my cup has been protected.  I will probably have to replace the cardboard every couple of days, but at least it is more eco-friendly than the plastic lids were. 

Really, I think I'm just going to have to save up and buy a metal punch so that I can make straw holes in the metal canning lids.  Hmm... Those lids would be perfect for parties, since we could all just sharpie our names on them and they would wash off later so I could reuse them. Seriously, what could possibly be more eco-friendly than that?
xoxo

Friday, April 20, 2012

Fancy Pants and Quiet Tissues

I got to go to an awards ceremony last weekend.  It was very fancy-shmancy with a red carpet and minor celebrities and everything.  Ooh la la!  I knew what I was going to wear (ahem, not an evening gown), but my hair is at an awkward stage.  It doesn't exactly do 'styles' right now.  What was Crochet Dynamite to do??

I guess the picture was a spoiler alert, but I made a headband to hold my Used-To-Be-Bangs back, and the quasi-french twist in place. Crisis averted.

But wait! Who could have ever guessed that it would become my favorite accessory this week?  I have since then worn it to the beach, and to Target, and around the house, and I have looked fabulously stylish.  So thank you, awkward length hair, for requiring some crocheted awesomeness.  Not having to push my bangs back a hundred times a day has been amazing.

Okay, so the pictures don't really do it justice.  It's subtly sparkly and bronze, instead of a brownish rust color. Trust me, it would look awesome in any color though.  I am going to make some for Mims with buttons and flowers for when she starts Kindergarten in the fall.

If you'd like to make one too, it was really easy.  I have been inspired by Mary Jane Hall recently, with her stretchy crochet techniques, and her garment shaping using stitch sizes.  She has several headband patterns, but none that had the vintage-y pinup look that I wanted, so this is what I came up with.

Minor Awards Ceremony Headband
Supplies:
Vanna's Glamour (or other fine weight yarn)
Size D hook
Yarn Needle for weaving in ends

Chain 151.
R1: Starting in 2nd ch from hook 2 sc, 3 hdc, 5 dc, 3 hdc, 17 sc, 10 hdc, 70 dc, 10 hdc, 17 sc, 3 hdc, 5 dc, 3 hdc, 2 sc, ch 1, turn.
R2-3: (working in back loops only) 2 sc, 3 hdc, 5 dc, 3 hdc, 17 sc, 10 hdc, 70 dc, 10 hdc, 17 sc, 3 hdc, 5 dc, 3 hdc, 2 sc, ch 1, turn.
R4: (working in back loops only) 2 sc, 3 hdc, 5 dc, 3 hdc, 17 sc, 10 hdc, 70 dc, 10 hdc, 17 sc, 3 hdc, 5 dc, 3 hdc, 2 sc.
Fasten off. Weave in ends.

 Wear to a Minor Awards Ceremony and look fabulous!

I think you could also add a few more rows to make it thicker and it would still look super cute.  You could also turn it around so the sassy knot is in the front.  In fact, combine those two ideas and you've got a rockabilly head wrap worthy of your victory rolls! Wait, do you wrap up the back if you pin up the front? Okay, well even if that's not really a style, trust me, it would be cute.

One more note about the awards ceremony, where I waited in line for the valet behind  Martin Kove  (who you would know as the evil sensei, John Kreese, from the 1984 classic The Karate Kid) and walked past Kristin Bauer van Straten (known exclusively in my circles as Pam De Beaufort from True Blood), which I selflessly attended despite the fact that I was at the tail end of a cold.  I needed tissues at the ready, because my runny nose waited for no appropriate clapping moment to dig tissues out of a crinkly plastic packet.  I needed them fast and quiet.  Thus, the Quiet Tissue Cover.

Why yes, my tissues do match my headband! How delightful that you noticed.  I pulled the plastic wrapper off my pocket pack of tissues and snugged them into their Minor Awards Ceremony-worthy case.  Worked like a charm.  Fancy? Yes. Quiet, so as not to disturb those around me? Yes as well!  Runny nose problems? Well, yes, but nothing that a couple of stealthy tissues couldn't solve.

All in all, I would call the evening a success.  And there was nothing so sweet as getting the car back from the valet and whipping my heels off.  I mean, fancy is good, but comfortable is so much better...
xoxo

Wednesday, April 18, 2012

Size matters when you're hooking...

Ahahahahahaha!!! I couldn't help it, the title cracked me up so much I had to use it.
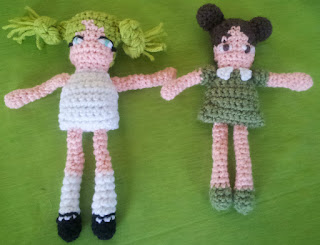
I have been working on a new project, some little crochet dollies inspired by the Black Apple dolls, and the dolls by Mimi Kirchner.  I've been having fun.  I thought I would make them with dresses, but after I finished the first one, I realized that the dolls would be a lot more fun if you could dress them up in different outfits. Thus the second version, in her modest undies.  I also wanted to try socks and mary janes on the second one.
Did you notice the size difference between the dolls?  No, it's not trick photography or forced perspective, I just neglected to use the same size hook with the second doll.  How annoying.  The one on the right is Mo Bear, and is a mini version of Mims, which I made with an F hook.  I used a G hook on Lucy Limelight on the left.

I'm trying to decide which I like better.  I am going to put this project on the back burner for a little bit, while I decide what kind of clothes to make for them.  And I will make another one, since I am not super happy with the green hair, which just didn't pop like I had hoped it would against the peach.  I'm not sure I like the braided bear ear hairstyle either...  Just thinking out loud... And I think the undies could be a little narrower, so that they would fit better under a dress... And what if I did the top row of the legs in white as well for a bloomers/panties look...?

What do you think?

Monday, April 16, 2012

Soaptastic Fun!

I love Bath and Body Works foaming soaps.  I have them in every bathroom of the house, and next to the kitchen sink.  I am a huge fan.  What I am not a fan of, however, is how much my daughter Mims loves these soaps.  Granted, she is five, and I adore the fact that she is in love with washing her hands, but she has this ridiculous habit of adding water to a soap bottle that is getting low so I won't know how much soap she's used.  Yes, she gets in trouble for using more that two pumps of soap.  I hate that she has given me a good reason for that rule.

If it was just me and Jake, I wouldn't care so much about the watery-ness of the soap in the bathroom.  But we live with my NINETY-ONE (when you get that old, you get your age in all capitals. Seems cruel, but I didn't make that rule.) year old grandma (Mema, to you that might know her).  Mema is very nearly blind from Macular Degeneration, and relies on the single pump of soap to provide for her hand washing needs.  When Mims waters down that single pump, we run into issues.

Bath and Body Works sells beautiful silver covers for their soaps, but you can still see the bottle through the cover.  I admit, for most people, knowing when you're about to run out of soap is a good thing.  But I have a stockpile, and I don't need to know until the pump pumps no more!  So I have come up with a pattern for a soap bottle cover that will solve my needs.  Plus, I used cotton yarn so I can throw them in the washer and dryer when the covers get gross.

 FOAMING SOAP COVER
I used worsted weight 100% cotton yarn and a size G hook.

Chain 32. Using a sl st, join the ends to form a ring.
R1: Ch 1, sc in each ch space, sl st in first sc to join round. (32 stitches)
R2-12: Ch 1, 32 sc, sl st in first sc to join round. (32 stitches)
R13: Ch 1, (sc 2 st tog, 14 sc) 2 times, sl st in first sc to join round. (30 stitches)
R14-15: Ch 1, 30 sc, sl st in first sc to join round. (30 stitches)
R16: Ch 1, (sc 2 st tog, 13 sc) 2 times, sl st in first sc to join round. (28 stitches)
R17-21: Ch 1, 28 sc, sl st in first sc to join round. (28 stitches)
R22: Ch 1, (sc 2 st tog, 12 sc) 2 times, sl st in first sc to join round. (26 stitches)
R23: Ch 1, 26 sc, sl st in first sc to join round. (26 stitches)
R24: Ch 1, (sc 2 st tog, sc 2 st tog, sc 2 st tog, 7 sc) 2 times, sl st in first sc to join round. (20 stitches)
R25-29: Ch 1, 20 sc, sl st in first sc to join round. (20 stitches)
Fasten off, weave in ends.  Slip over your soap dispenser and enjoy!


If you would like to add a flower to the front of your cover, I would highly recommend attaching the flower to a bobby pin and then using the bobby pin to hold the flower on the cover.  That way you can detach the flower easily for washing (or if your hair styling needs require a flower for the evening).  If you like the poppy and peony flowers that I made, I was delighted to find the instructions here. (via Craftgawker)
xoxo

Update 12/4/12:  So, I have had a lot of trouble with this pattern, because I don't seem to be crocheting as tightly as I used to, which is making these covers come out HUGE for me.  Weird.  I've updated the pattern HERE so if you're a normal-to-loose crocheter (or anyone who likes to work in dc, instead of sc stitches - 15 rows and you're done, yo!) go check it out.  I think you'll like it much better.
xo Jaime

Saturday, April 14, 2012

Crochet Vases: Something New to Think About

Lately I have been thinking a lot about crochet.  I like its density, and the way it holds its shape, which is a quality that sets it apart from knitting and sewing.  Yes, you can make thicker knit fabrics, or you can sew with interfacings, but sculptural pieces are math challenges.  With crochet, its less math, and more It Just Turned Out That Way.
I have been very inspired by some crochet baskets that I saw recently.  They were very pretty, and brightly colored, and they got me to thinking about how cool it would be to have a crocheted vase.  The density of the crocheted fabric makes it perfect for traditional vase shapes, but water would make it a soggy mess.
I didn't want to crochet around a vase, or a baby food jar, mason jar, or empty can.  I wanted it to look like it was a magic trick, like somehow this vessel that in no way is watertight is holding water and flowers.
So what I needed to do was waterproof and seal the crocheted vessels.
Crochet and Liquid Polymer Clay
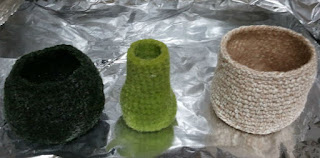
I started out by crocheting some basic vase shapes.  I made two out of acrylic yarn, and one out of cotton.  I didn't make them very large, since I wasn't entirely sure that my experiment was going to work.  Then I used some liquid polymer clay (the kind that's used for image transfers) and coated the vessels.  I only coated the inside of the cotton vase, since it was large enough to allow my whole hand inside as I was working.  The two acrylic pieces I ended up coating the inside and the outside, since they were small and the liquid was kind of hard to control.  I was surprised, and a little disappointed, at how the acrylic yarn fuzzed up as I rubbed the liquid polymer clay in. Then I sealed them into a foil packet and baked them at 300 degrees for 30 minutes.


The two acrylic pieces ended up very hard and inflexible. Very vase like.  I was delighted!  The cotton piece looked like crochet on the outside, with a smooth translucent coating on the inside. Again I was delighted! The cotton vase turned out just like I had hoped, it was going to be my magic trick.

Unfortunately, the dark green piece had not been completely sealed, so water just poured out of it like you would expect from a crocheted vase.  But the other two, my light green bud vase and my cotton crochet magic trick vase, were watertight and ready for use.  So I went out to the garden and picked some roses.


I think this is just the beginning.  I am looking forward to experimenting with larger forms, and now that I know what to expect, I think I'll be working on these exclusively with cotton.  I'd like to try a completely coated cotton piece, and I want to try some more decorative multicolored pieces. But, for now, I would call this experiment very successful.
xoxo

Thursday, April 12, 2012

I Love California Rolls!

When I was in elementary school, my mom worked at a preschool.  One day at lunchtime she realized that one of her students was choking on his lunch.  He wasn't able to breathe, and he started turning blue.  She quickly gave him the Heimlich Maneuver and out popped an un-chewed piece of sandwich.  The next day, the boy's mother brought my mom a present.  She had made California Rolls for my mom because she appreciated my mom's quick thinking that saved her son's life.  
I was not excited about the gift.  I couldn't get my mind around the blackness of the nori (which I associated with the stinky ropey strands of seaweed that washed up on the beaches nearby), and the raw fish in the middle (which I didn't realize wasn't actually raw at all).  But I liked rice, and I liked soy sauce, and my mom was reluctant to share her treasure, which made me determined to try one. One bite, and I was hooked.
Now, almost thirty (gasp! I'm not that old!)  years later, I adore sushi.  I adore raw fish.  I buy packages of seaweed in bulk at Costco for evening snacking.  Last summer I had an awesome opportunity to make some fresh salmon sashimi with some wild salmon that I caught myself in Alaska.  But my first love, and my truest love, will always be with the California Roll.  Filled with crab and avocado, rolled tightly and sliced in to single bite pieces, topped with pickled ginger and a smidgen of wasabi, I am hungry just thinking about it!  


So, this is my take on California Roll Coasters. I am really happy with how they turned out. In fact,  I loved them so much, I made myself a scarf as well.  What I think I like best about them is that they're not perfectly round. They're a little misshapen and more oval than perfectly round, which is exactly like how my homemade California Rolls always turn out. 


The California Roll Coasters
Each coaster is approximately 4" across
Make 4 for a set, or if you're really feeling generous 6 or 8 for a really cool gift.


Supplies:
Loops & Threads
Snuggly Wuggly baby sport
Color 01512 Perfect Peach

Red Heart Soft
Tangerine

Loops & Threads
Impeccable
Color 01223 Grass
Color 01243 Forest
Color 01005 White

Red Heart Soft
Dark Leaf


Size G hook

Instructions:
Crab
Using Perfect Peach chain 4.
R1: Sc in second ch from hook, sc in each ch, ch 1, turn. (3 st) 
R2-3: sc in each st across, ch 1, turn. (3 st)
R4: sc in each st across, switch to Tangerine, ch 1. (3 st)
R5: 2 sc in corner, 2 sc down side, 3 sc in corner, 1 sc across bottom, 3 sc in corner, 2 sc along side,  3 sc in corner, 1 sc across top, 1 sc in first corner, sl st to first sc of round. (18 st) 
Fasten off. Weave in ends.

Avocado
R1: Using Grass, pick up and sc 5 st along side of crab piece, ch 1, turn. 
R2: 5 sc, switch to Forest, ch 1, turn.
R3: 5 sc. 
Fasten off, weave in ends.

Rice and Nori
R1: Using White, pick up and sc 31 st around edge of crab/avocado piece, making sure to put 3 sc in each corner, and sl st to join round. (31 st) 
R2: ch 1, (2 sc in next sc, 2 sc) 10 times, sc,  sl st to first sc to join round. (41 st)
R3: ch 1, sc in each st,  sl st to first sc to join round, switch to Dark Leaf. (41 sc)
R4: ch 1, (2 sc in next sc, 3 sc) 10 times, sc,  sl st to first sc to join round. (51 st) 
Fasten off. Weave in ends.


The California Roll Scarf
Approximate length 66" long
Follow instructions for The California Roll Coasters and make 16 coasters.  Using Dark Leaf yarn, sew coasters together right sides facing up, matching stitches along the edge.  I used a whip stitch, matching the edge of 8 stitches, to sew mine together.
xoxo

Monday, April 9, 2012

The Momo-ness of it all... The sheer Momosity...

Recently we have become streaming Netflix subscribers.  Mims has previously watched Phineas and Ferb with her grandparents, but now that we've got 3 seasons of it at home, it's become our daily go-to show when we don't know what to watch.  I am not ashamed to admit that Mims and I are a little obsessed.  Even Jake is now singing along with the show.  Mims occasionally asks us to call her Isabella, and we all adore Candace, the older sister who loves Ducky Momo and cannot seem to bust her brothers, no matter how hard she tries.
Mims also adores Ducky Momo. Thus, I knew that my next project was going to be a big hit around here.
This was a fun challenge for me. Originally, I had thought that I would just buy (gasp! shock! the horror!) Mims a doll from the Disney Store, but much to my surprise, Ducky Momo dolls are no longer available, and were a little out of my price range even when they had been available.  So my next stop was a good ol' Google search for a fan art pattern.  I was willing to sew, knit, or crochet it, but the best I could find was an Etsy seller that makes snuggly-looking softies for sale (again, a little out of my price range) and a beautiful papercraft Ducky Momo, that my 5 year old would destroy in two minutes flat.  If someone else out there has created a Ducky Momo pattern, I wasn't able to find it.  

 But here's my problem.  I love Disney.  I live 3 miles from Disneyland.  I have worked for Disney.  Many of my family members have worked for Disney.  We are a Disney-loving family.  And I don't want to get sued by people that I respect, and I don't want to steal designs from people that I respect. Truly, Ducky Momo is my friend...
So here's what I came up with: A Ducky Momo FAN ART doll for my Mims.  It is not exactly like Ducky Momo. The legs are different (cough, which one could leave off, if one wanted a more 'authentic' look, cough).  The pie shaped eyes are rounder than the cartoon's eyes.  There's no visible seam down the center of the doll.  The shoulder area of the wings are rounded.  So, now that I've told you everything I did 'wrong,' do you still want to make it?
Yeah, you do!  Because it looks very similar, and Ducky Momo is awesome!  By the way, did you notice the cute toothless gap in Mims's smile? You are so observant!! You get a reward!!  Here's my pattern:
The pattern is a work in progress.  I wrote it out as I was working on the doll, and I've cleaned it up, but I've never written a pattern for a multi-step doll before and I am certain that I will need to clarify something.  So, when you discover a mistake, or need some help figuring out what I was talking about, please send me an email!  I will get back to you, and your helpful feedback will make the pattern better for everyone else.  Which is a super good thing, since it's the only one out there... LOL!!!!
xoxo

Saturday, April 7, 2012

Happy Easter Crochet

I decided to make Mims an Easter basket this year, since she has lost my beloved Peeps basket, and I didn't want to spend $12 to buy her a mass market superstore plastic one. Not that that's my issue, just that I'm cheap and I'm trying to raise her to think that homemade + not like everyone else = cool.  Plus, my mom bought her a beautiful basket for the church Easter Egg Hunt, and I wanted to control the size of the basket that the Easter Bunny had to fill, since I'm not super into loading her up on ten pounds of sugar (like ANYONE thinks that's a good idea. Please insert eyeroll here.).

 So this is what I came up with.  Simple and small, but it's got a little sparkle, so of course Mims loves it.
I also made this little bunny box for her to play with.  I would have given it to her from the Easter Bunny, but as you can see, I used the same yarns as her basket, and Mims is pretty savvy.  Also, she saw me working on the bunny, and even though she thought I was just making an egg, I'm pretty sure that it wouldn't have been too long before she figured it out.  And I'd like to let her believe in magic for just a little while longer.
Free-range bunny, out of the box.
Night, night bunny!
xoxo

Tuesday, April 3, 2012

Bacon Baby Blanket 2.0

I have finally finished my new and improved extra-lumpy bacon baby blanket.  Yippee! I am really pleased with how it turned out.  The bacon looks right, and I think the mom of the baby-to-be is going to be thrilled.  It's a great size too, not too big, heavy enough that it won't fall off and get caught in the wheels of a stroller, and super washable when the inevitable spills and crumbs and general grossness require a washing.

Bacon Baby Blanket 2.0
Finished Size: approx. 29" x 28"

Supplies Needed:
Lion Brand Yarn Vanna's Choice
MC A - 180 Cranberry - 1 skein
MC B - 133 Brick - 2 skeins
CC A - 123 Beige - 2 skeins
CC B - 126 Chocolate - 2 skeins
4.25mm/G crochet hook
Yarn Needle
MAIN BLANKET:
With MC A chain 101.
R1: sc in second ch from hook, sc across all ch, change to MC B, ch 2, turn. (100 st)
R2: hdc across all st, change to CC A, ch 2, turn. (100 st)
R3: (4 sc, 3 hdc in next st) 20 times, change to MC A, ch 2, turn. (140 st)
R4: (sc 3 st tog, 4 hdc) 20 times, change to CC A,  ch 2, turn. (100 st)
R5: sc across all st, change to MC B, ch 2, turn. (100 st)
R6: (2 sc, 2 dc in next st, 2 dc in next st, 6 sc) 10 times, ch 1, turn. (120 st)
R7: (6 hdc, sc 2 st tog, sc 2 st tog, 2 hdc) 10 times, change to CC B, ch 2, turn. (100 st)
R8-11: sc across all st,  ch 1, turn. (100 st)
R12: sc across all st, change to MC A, ch 2, turn. (100 st)
R13: (4 sc, 3 dc in next st) 20 times, change to CC A, ch 2, turn. (140 st)
R14: (sc 3 st tog, 3 sc, 3 dc in next st) 20 times, change to MC B, ch 2, turn. (140 st)
R15: (sc 3 st tog, 4 hdc) 20 times, ch 1, turn. (100 st)
R16: hdc across all st, change  to CC A, ch 2, turn. (100 st)
R17: (3 sc, 3 dc in next st, sc) 20 times, change to MC A,ch 2, turn. (140 st)
R18: (sc, sc 3 st tog, 2 sc, 2 dc in next st) 20 times, change to CC B, ch 2, turn. (120 st)
R19: (sc 2 st tog, 4 sc) 20 times, ch 1, turn. (100 st)
R20-22: sc across all st, ch 1, turn. (100 st)
R23: sc across all st, change to MC A, ch 2, turn. (100 st)
R24: sc across all st, change to MC B, ch 2, turn.(100 st)
R25-90: repeat rows 2-24 three times.
R91: hdc across all st, change to CC A, ch 2, turn. (100 st)
R92: (4 sc, 3 hdc in next st) 20 times, change to MC A, ch 2, turn. (140 st)
R93: (sc 3 st tog, 4 hdc) 20 times, change to CC A, ch 2, turn. (100 st)
R94: sc across all st, change to MC B, ch 2, turn. (100 st)
R95: (2 sc, 2 dc in next st, 2 dc in next st, 6 sc) 10 times, ch 1, turn. (120 st)
R96: (6 hdc, sc 2 st tog, sc 2 st tog, 2 hdc) 10 times, fasten off. (100 st)
Weave in the 120 (or so) loose ends.

BORDER:
Pick which side is going to be the front (both sides are going to look amazing, so just choose the one you like best.)
R1: Starting in the top corner, attach CC A and ch 2, 2 sc in same st, 98 sc across top edge, 3 sc in next corner, 98 sc across side, 3 sc in corner, 98 sc across bottom, 3 sc in corner, 98 sc across side, sl st to 2nd ch in first corner cluster.
R2: Ch 2, 2 sc in same st, 100 sc across top, 3 sc in corner st, 100 sc across side, 3 sc in corner st, 100 sc across bottom, 3 sc in corner st, 100 sc across side, sl st to 2nd ch in first corner cluster. Fasten off.

Weave in the loose ends and celebrate the fact that you're done!


Abbreviations used:
ch - chain
sc - single crochet
hdc - half double crochet
dc - double crochet

xoxo

Edit. 6/9/12: Hello Dynamos!  It was brought to my attention that there I had made a mis-type in the numbering of the pattern.  I've corrected it now in Google Docs to read correctly (I also added an abbreviations key and adjusted my website name to reflect my new dot-com-y-ness).  I am grateful to the kind soul that pointed out my mistake, and encourage anyone that has any questions to please feel free to email me at CrochetDynamite@gmail.com  
xo Jaime

Edit 5/7/14: Hello Dynamos!  This was my first pattern, and it was back when I thought I needed to put the instructions in some sort of printable file (before I knew you could just copy and paste any patterns you want into a word document and print them out for your crochet binders!).  I've moved the full pattern to this page now, so you don't have to mess with Google Docs anymore.  Love to you all!!!
xo! J
Related Posts Plugin for WordPress, Blogger...